Thursday, 25 June 2015

Chapters 9 & 10 Stitch to translate

This chapter is in two parts:
a.  Translating rubbings on to paper
b.  Translating rubbings into stitches on fabric

a.  Translating rubbings on to paper

Rubbings from relief surfaces on to paper

I selected a number of relief surfaces from previous chapters to take 2-dimensional flat images.  Some of the rubbed marks will eventually be translated into stitch, 3-dimensional textured surface.

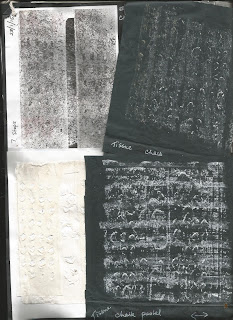
Mostly black papers were used:  tissue, art paper, pastel paper
White on black tools: chalk, white crayons, oil pastels, chalk pastels, Markal painting stick
Some rubbings were with candle on white paper then given an ink wash, but these were not as successful.

Rubbings that were just smudges were discarded and some surfaces selected did not produce good marks with distinct images, such as the paw print images and the grid of varying textures causing paper to tear.
Generally used flat side surfaces of sticks, sometimes using different amounts of pressure and trying different directions.
I tended to use one type of stick for each rubbing, although could have tried several together.
I retained all samples.
The chalk like images were fixed using a fixative spray.
The Markal stick images were left for a couple of days to naturally dry, not needing the spray
On all samples I noted the stick used and showed the direction of rubbing as well as naming the original relief, commenting on the best rubbing tool.

From the collection I selected what I thought were the best examples.  Tissue paper worked best, with three effective tools, chalk pastels, oil pastels and Markal stick.  Chalk was only successful if wanting a very delicate subtle design.
The four chosen included, from Chapter 3:
  • Steps - scratched crepe paper
  • Ripples with one pebble - textured wallpaper shapes overlaid with grease proof paper then scrumpled tissue
  • Barnacles on a groin - gathered sheet and gathered strips of crepe paper
From Chapter 2:
  • Ripples in the sand - rolls of tissue paper forming waves across the paper
(Others from Chapter 3 of a shell and of pebbles on the beach also worked well but did not go on with these in stitch)

Insert 4 A4 sheets showing photo, textured surface and a couple of rubbings


b.  Translating rubbings into stitches on fabric

Of the four samples shown above I selected THREE to translate into stitch.

The idea was to use mostly ONE STITCH on each, considering which of those new ones learnt in Chapter 9 might be best suited to the image.  This stitch could be varied in size, thickness, using a range of threads and yarns and other items.
I also considered which black fabric could be used for the background.
I also wanted to use fabric with Markal stick rubbings, selecting a smooth polyester satin fabric which was particularly effective.

Using Markal stick
Rub over the fabric using the end of the stick, at a slant, in one direction
Leave the rubbing to dry naturally over two days for the paint to stick (fixative spray not needed)
Iron the fabric with the rubbing face down between two sheets of baking parchment
The rubbing can be part of the finished stitched sample

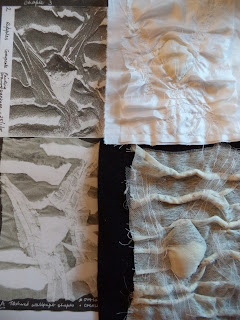
The three samples are accompanied with an image of the textured surface, then a second with the main image, the textured surface, the main rubbing on paper, and Markal image on fabric and the finished stitched piece.  For each will be itemised the choice of background fabric, stitch(es) selected and threads used.

Sample 1
Steps

Insert two photos


Background fabric:  Black cotton dyed with a mottled effect (commercially produced)
Selected stitches:  Fly stitch
Threads used: White 2-ply wool, white cotton machine
Comments:  I decided to leave this piece with only two threads, varying their size and arrangement, picking up the marks from the rubbing.  To help replicate the lay out tacked a border and simple 4 x 4 grid on the fabric.  I feel the stitching does reflect the rubbing, but not necessarily the bulk and metallic nature of the steps

Sample 2
Ripples

Insert two photos using organza


Background fabric:  Reverse side of the black cotton dyed with a mottled effect (commercially produced).  The mottled effect on the reverse fits better with the background of the rubbing
Selected stitches:  Chevron stitch - adapted weave effect to give an indication of change of direction in the ripples
Threads used: White cotton wool for the running stitches, white organza in strips woven through the running stitches
Comments:  I decided to leave this piece with only two threads, varying their size and arrangement, picking up the marks from the rubbing.  To help replicate the lay out tacked stitches at each end of the rows of ripples.  I feel the stitching does reflect the rubbing and using the organza gives a more 3-D finish and good texture.  The fringes released at intervals were retained to capture the occasional streaking from the rubbing.

Sample 3 is another version
Ripples

Insert two photos using Cretan stitch


Background fabric:  Reverse side of the black cotton dyed with a mottled effect (commercially produced).  The mottled effect on the reverse fits better with the background of the rubbing
Selected stitches:  Cretan stitch - altered size and direction of stitch to give an indication of change of direction in the ripples (Other stitches considered were blanket stitch, wave stitch and/or filling stitch)
Threads used: White 2-ply wool and white machine thread, the former for more intense white the latter where the image was more faded.
Comments:  I decided to leave this piece with only two threads, varying their size and arrangement, picking up the marks from the rubbing.  To help replicate the lay out tacked stitches at each end of the rows of ripples.  I feel the stitching does reflect the rubbing.   I considered adding extra layers to enhance the raised texture or wrapping some parts with other threads, but preferred to leave it to show the effect of the Cretan stitch.  This sample was not as textured as the first ripples.

Sample 4
Groin with barnacles

Insert two photos


Background fabric:  Black polyester satin with Markal stick rubbing to guide stitching and part show alongside stitched work.
Selected stitches:  Couching using blanket stitch - altered size and direction to attach yarns for the wood textured background.  Felt the blanket stitch could also be used to build up layers for the barnacles - the finer thread stitched into background fabric the raised centres interlaced within the lower stitch.  Tried adding some bullion knot stitching.
Threads and yarns used: White viscose machine thread, white cotton thread and white cotton wool.  The couched yarns were raffia, bundles of cotton perle threads cut from a previous worked sample, 2-ply wool with silvery thread and Welsh hand spun wool.
Comments:  Feel this sample reflects the rubbings.  It may be interesting to produce a dense bullion knotted sample if time allowed, interspersed with French knots using different threads.  Another idea may be to layer the background fabric with one or two layers of fabric cut using a soldering iron.  The next three photos show the results of some experiments.  Like plastic packaging, organza (both white and black) and hand cleansing cloth.  I also produced a sample of natural scrim distressed to form gaps and holes in the grain. The barnacle stitching could come up through spaces.


Wednesday, 24 June 2015

Chapter 9 Threads and Stitchery

In this chapter we are looking at threads, stitches and stitching, stitch effects both formal and informal, going into looking and making further rubbings from which stitch can develop

Threads
In this module and course a thread is anything that can be threaded into a fabric surface, both traditional and non-traditional.  This includes knitting yarns, machine threads, metallic threads, wire, string, ribbon, fabric strips, plastic strips, grasses, sea weed, shoe laces, and raffia.  Non flexible includes solid items such as pins, twigs, and wooden sticks.
Where the appropriate needle cannot punch through fabrics, or the thread has qualities that resists easy sewing or the fabric restrains puncturing then the items can be held in place through couching or weaving, wrapping around stitches in a lower layer of stitching.

This chapter contains work mostly in white threads on black fabrics.

A collection was made of a selection of threads and put in an open tray:

Insert picture of tray of threads


It is useful to keep a dictionary of threads, with a note of its name, where obtained and cost for calculating expenditure on the final sample.  A dictionary is in alphabetical order, this is not, but I have tried to arrange them by natural threads on the left and man made on the right, trying to group them by type e.g cotton, silk, wool or pipe cleaner, polyester, viscose.

Insert picture of card file


Since producing this file I have transferred the cards into a walleted photograph album, not so bulky and easier to look through.  The sequence remains the same.

Stitches and stitching
The same stitch can often have different names, sometimes related to the location where it can be found.

It is interesting to try and learn those that give different variations in shape and formation.  I have tried to extend my knowledge by learning new ones, with help from different publications.

Insert photo of some reference sources


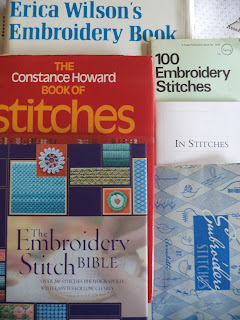
I have a record of  those stitches used in this chapter, by reference to books with pages in my notebook including some indication of additional information.  100 Embroidery stitches is grouped by categories, (shown below), Erica Wilson's book is arranged by sewing technique with those stitches of use in that technique, such as Crewel embroidery.  Most books have black and white illustrations, whereas The Embroidery Stitch Bible is in colour.  I particularly liked Jan Beaney and Jean Littlejohn's as well as Constance Howard's as illustrations were in monochrome and gave a vast range of both formal and informal approaches to stitching using a particular or variations on it.

Here are five categories of stitch based on how they are physically formed.
I have tried 4 or 5 from each type, the names given alongside the category in order as shown in the sample below:
  1. Flat stitches, formed with a simple straight stitch, such as Herringbone, Thorn, Dot or seed, Chevron and Cross
  2. Looped stitches, formed by looping the thread under the needle, such as Fly, Cretan, Feather, Blanket and Wave
  3. Chained stitches, formed by connecting loops, such as Chain, Chain cable, Wheat ear, Split, and Twisted chain
  4. Knotted stitches, formed like a loop but pulled firmer, such as French knot, Knot (Snail's Trail), Bullion, and Coral
  5. Composite stitches, formed in different ways combining two layers of stitch.  An initial stitch with another stitch formation by needle threading, whipping or lacing, such as Laced running, Whipped chain, Laced Herring Bone and Interlaced Herring Bone
Insert Photos of sampler


 Stitch effects   
Once a basic stitch is learnt it is fascinating to see how it can be manipulated into different effects, by varying size, spacing, direction and using different threads or different numbers of strands of the same thread.

I chose Fly Stitch in order to make a series of Formal stitching rhythms and Informal stitching rhythms.

Formal stitching rhythms
Used 6-ply cotton embroidery threads with variation in the number of strands used

Insert photo of Sampler with formal stitching using frame to stretch and firm the fabric layer


This is a grid of  3 x 5 4cm squares
Going down in rows starting with the top row, from left to right

First row: Worked in a linear pattern - four rows altering the length of the tail; as the first, but stitches on their side; Separate marks
Second row:  Varying the size of stitch - four rows, Alternately altering the direction of the stitches, first individual stitches then alternate rows
Third row:  Using one strand Varying the direction, at an angle, elongating the stitch and spacing different groups
Fourth row: Increasing the number of threads for tonal change; Arranging the threads to form a circular design; Altering the angle in rows to form a new pattern
Fifth row: Altering the main stitch into a variation of it, in this example twisted fly stitch - frequency direction and size; Inserting stitches in rows within each other to form a shape; Mixture of stitches, varying size, direction and thicknesses with some overlapping

Down the side: a snake like arrangement - varying size, length of tail to smaller individual fly stitches

Informal stitching rhythms
For this produced an array of  rhythmical patterns, varying stitch size, direction, arrangements, overlapping, creating new shapes, with different threads, weaving and adding beads.  Great fun trying different ways of using fly stitch and twisted fly stitch. The sampler is the length of a ruler 30cms

Insert photo of  Sampler with informal stitching


In further chapters as well as using Fly stitch will try to vary the stitches and threads to capture the texture of the work.

The following illustration is showing the back of pebbles held within fabric and is an addition to an earlier chapter.
It is not related to the chapter 9 content.


Saturday, 30 May 2015

Chapter 8 Paper relief into fabric relief

Five paper relief samples were selected from Chapter 3 related to textures I liked in the seascape.
These are now translated into manipulated fabrics and stitch; two for each, one soft texture the other harder texture.  They show tactile contrasts using different materials and manipulated methods.
  1. Ripples around a pebble (see Sample 2, Ch 3)
  2. Pebbles on the beach (see Sample 3, Ch 3)
  3. Groin (barnacles on wood) (see Samples 5a, Ch 3)
  4. Seaweed on groin (see Sample 5b, Ch 3)
  5. Combined steps and paw prints (see Samples 7 & 6, Ch 3)
For each, there is the soft textured piece followed by the hard textured.
In order to vary the techniques, fabrics and stitches between the samples I set up an A3 sheet divided into two, labelled 1 to 5, noting on the left ideas related to soft textures, on the right harder textures.  Sometimes techniques changed as I progressed so these were noted alongside the original thoughts.

1.  Ripples around a pebble


2.  Pebbles on the beach


3.  Groin (barnacles on wood)


4.  Seaweed on groin


5.  Combined steps and paw prints


I particularly enjoyed making the harder textured sample for 1. and it was a good opportunity to use soldering iron and candle for the harder tactile texture for 4.  I like the look and feel of the softer texture in 2.  It was suggested maybe I could combine steps and paw prints to form a story which I feel these two samples divided on the diagonal show for 5., although the paw prints using wadding cut away with a soldering iron have worked better than the Tyvek bits heated using an iron and parchment paper above and below the material.  The only sample not complete is the hard textured sample for 2 where pebbles were spaced and trapped behind one piece of cotton scrim, gathered using stitch at the back to prevent them escaping.  The amount completed on this sample does show matching patterns for seven pebbles.

Health & Safety was kept when using the heating items: using a well ventilated room, ensuring the flex did not provide a trip hazard, the soldering iron was kept in a upturned flower pot with a glass cutting surface, and the candle held steady in a candle holder, using prongs to hold the fabric and some water at hand in a metal container to quench any flaring fabrics.

Monday, 4 May 2015

Chapter 7 Tactile contrasts using fabric manipulation

Made an experimental sampler using different fabrics in different manipulative ways. 
The sampler contains 16 triangles with 5cm edges. 
In order to obtain contrasts in texture I considered a selection of ideas divided according to R - rough textures; M - medium textures between rough and smooth – S ( 5 or 6 of each) based around fabrics collected in white or neutral colours. I set up a plan showing variety of texture, including fabric, technique and threads, either hand and machine stitched, then worked through each.  Techniques were used from previous chapters with some new ones, altering some as I went along.  Where possible I made sure like textures were not placed next to each other so contrasts were more evident.  The original plan changed accordingly.
Sometimes triangles that had depth (rough texture) were actually soft to the touch, reflecting the softer fabric used and the wider spacing of the stitches.  The look of the technique may be sufficient to show the contrast, if the feel is not relevant.
Insert sampler

Followed by description of triangle: fabric, techniques including any inserts

The sampler also shows different edges to the triangles.
So how can different contrasts be formed;
Choice of technique:
  each has its own characteristics which can be varied
Choice of fabric:  each manipulates in a different way because of its physical characteristics. (See sheet accompanying the photograph of the sampler)
How stitchery is used to hold and manipulate the fabric to give different surfaces.  The cotton samples particularly show this variation.

Saturday, 25 April 2015

Chapter 6 Tucks, pleats and gathers

Recently acquired a copy of ‘The art of manipulating fabric’ by Colette Wolff.  Love it!  Inspiring!
In this chapter I’m going to try to present just a few samples, using different neutral coloured fabrics, hand or machine stitched using neutral threads.
I noticed how different fabrics used produce different effects following similar techniques.
The chapter is divided into three:
  • Tucks
  • Pleats
  • Gathers
A tuck is stitched along its length.
A pleat is pressed into shape, held in place by line(s) of stitch often at right angles to the pressed folds.
A gather is fabric pulled along a thread, wire, ribbon or other.

Tucks
The varieties of tucks include:
  • Basic straight tuck, folded fabric with straight machine or hand stitched lines, parallel to the fold
  • Slighly curved tucks
  • Filled tuck
  • Tucks on the bias or at angles or short lengths part crossing the piece of fabric
  • Straight tucks cut, or snipped to alter the texture
  • Straight tucks folded or stitched to alter the texture
  • Pin tuck, folded and stitched close to the folded edge
  • Twin needle machine stitched tucks
  • Fabric that was tucked cut and re-stitched together
Tucks can also overlap into pleats and gathers.
These samples were mostly made by using fabrics 30cm x 10 cm

Insert 12 photos showing different effects and techniques

Calico with series of horizontal machine stitching, different spacing, some hand stitching to alter the texture and pipe cleaners slid along tuck to puff the tuck 

Organdie: Similar techniques as calico. The fabric is stiffer and more pronounced tucks 

Silk with more soft and flowing tucks, effective shadowing.  The next sample highlights the height of the texture


Fine linen scrim.  Using similar stitching as previous, but particularly shows the effect of pulling and stretching the fabric afterwards


Silk: Tucks in both directions.  The machine stitching trapped the tucks haphazardly.  To view the texture machined the finished piece on to calico along two sides, to hold the tucks in place

Type of organza with ripple design in the fabric'.  Snipped and cut along the raised tuck edges using sharp scissors and pinking shears

Cotton: Full and part tucks machine stitched across and down the fabric with some single stitched rows to provide the ripple effect

Cotton: Rows of tucks then the fabric was cut into squares and re assembled

Cotton: Different tucks at differentt angles.  Pin tucks are shown at the top the zigzag effect and textural effect shown below

Particularly like the sample showing the snipped edges of the patterned organza and their different textures.  Would think that different fabrics would give different effects as well as different depths to the tucks.  As textured as that sample was it was soft to the touch, for a coarser texture would probably require a stiffer fabric such as calico or organdie.

Pleats
Pleats are generally measured and pressed into place before stitching.  The stitching holds the pleat type in place crossing over the pressed fabric.  Samples are machine stitched
It is useful to use a fabric that lends itself to staying in place such as cotton, linen, organdie or silk.  However if a looser form is required the fabric could be left un pressed allowing for a partly gathered effect and use of alternative fabrics:
  • Basic pleat
  • Basic box pleat, showing just one of the different types
  • Pleats held in place by more than one row of stitching
Insert 5 samples
Cotton: Basic pleat and box pleat, pressed then held in place with single row of machine sttiching

Cotton:  Pressed basic pleats .  The left held in place with three rows of patterned machine stitching.  The right has both sides of the pleat trapped with zigzag stitching, twisted back once to give the wave effect

Linen above polyester below.  Loose pleating where neither fabrics were pressed


Gathers
Gathers is fabric pulled over thread, wood, wire, pipe cleaners or other.  This can be achieved by different methods, using:
  • Hand running stitch along a length of fabric either one line along a narrow strip or following a pattern on wider fabric
  • Long machine stitching
  • Zigzag machine stitch over a length of wire, string, or wood
  • Using tucks to thread string, wood, pipe cleaners or other material
  • Pulled thread using fabrics with a woven surface
  • Shirring elastic in the bobbin
  • Gathering machine
Insert samples representing each technique
Cotton was used on the following nine collections of samples

Hand running stitch along a length of fabric one line along a narrow strip 15-20cm x 2 cm

Single row of hand stitch along one edge produce these rosettes, edges could be altered using pinking shears or other snips and cuts along the loose edge

This and the next two photos show different angles on these manipulated pieces.  Shorter stitches produce shallower folds.  The bottom sample has folded triangles in a concertina form held together by a thread down the centre of each triangle


Hand running stitch along a length of fabric following a pattern on wider fabric 15-20cm x 10cm
Each sample has a stretch of non-gathered fabric to show the layout of the stitches


Long machine stitching
 
 
Zigzag machine stitch over a length of wire, string, or wood
The zigzag width was altered dependent on the wire and string.  The wood was too thick for the machine so the third wood sample was hand stitched with some gathering

This fine fabric is open to more manipulation
 
 
Using tucks to thread string, wood, pipe cleaners or other material
 
A series of material fed through the tucks but not gathered: cord, string, straw, wooden kebab stick, double wool, soft pipe cleaner, parcel tape, coarser pipe cleaner

Using a pipe cleaner gives good gathers and the reshaping for added textural features
 
Pulled thread using fabrics with a woven surface
Cotton scrim with pulled threads evenly spaced in one direction .  The finer scrim on the left is more haphazard with gentler texture 

Both of these have coarse texture.  The left sample has threads pulled horizontally and vertically.  The right sample was stuffed with rolled pipe cleaners and as well as pulled thread a running stitch was used between each bump and the whole stitched to finer scrim background to ensure the inserts were not lost
 
 
 Shirring elastic in the bobbin
 
Cotton:  natural gathering.  The bottom was worked in a spiral to produce this lumpy feature

Organza:  more gathered effect.  Liked the gathering of the bottom sample ever decreasing lines of stitch
Looking forward to more work using these techniques and so many more.  No samples using a gathering machine as I have not got one.