Tuesday, 16 February 2016

Chapter 8 Research for Conservation Theme

Having studied the colour and textural effects of water and sky, this and the next couple of chapters are on studying a conservation theme, making compositions and designs for a wall hanging. 
The topic is Air pollution, in particular related to the Clean Air Acts.  The wall hanging will mostly relate to skies but there will also be a link to water.

Evidence of Research
I researched the topic of  Clean Air Acts from 1956, 1968 and 1993 within the UK.  These Acts were very much related to 'The Great London Smog' of  December 1952, which resulted in 4000 deaths and a further 8000 soon afterwards. There was a realisation that something needed to be done to reduce coal dust particles in the air at the time of fogs, and a need to build on earlier Acts.

According to Wikipedia  https://en.wikipedia.org/wiki/Clean_Air_Act_1956 it is suggested that this major event helped inspire the modern environmental movement.

Sixty years following this historical event, The Guardian published a series of photographs of the London smog
http://theguardian.com/environment/gallery/2012/dec/05/60-years-great-smog-london-in-pictures

What is 'smog'? Classic smog results from large amounts of coal burning in an area and is caused by a mixture of smoke and sulphur dioxide and in the 1950's a photochemical smog was identified.  Ground level conditions are especially harmful to senior citizens, children and people with heart and lung conditions, and as shown in 1952 resulted in death.
This definition is more fully given at http://www.sciencedaily.com/terms/smog.htm

Clean Air Act 1956
This Act aimed to control domestic sources of smoke pollution by introducing smokeless zones.
Air pollution was dramatically reduced:
  • domestic emissions reduced because of smoke control area
  • gas and electric usage increased, coal usage decreased
  • cleaner coals had a lower sulphur content
  • power stations used taller chimneys and
  • were located away from urban areas
  • decline in heavy industry
Clean Air Act 1968
This Act brought in:
  • the use of higher chimneys for industries using coal, liquid or gaseous fuels, to allow better dispersal of sulphur dioxide
  • further development of smokeless zones
  • imposed reduction of particulate emissions
Clean Air Act 1993
This Act extended the earlier Acts:
  • to eliminate 'dark smoke'
  • improve furnaces and the height of their chimneys
  • declare smoke control areas under the auspices of  Local Authorities
  • and for them to adapt fireplaces in private dwellings, churches, chapels, charities
  • regulations for motor fuel
The above is with reference to:
http://www.air-quality.org.uk
http://www.legislation.gov.uk/ukpga/1993/11/introduction

Ringelmann Chart
This was developed in order to measure the smoke colour.  It is a practical easy to use series of grids measuring smoke colour emitted from a chimney over a period.  I found a brief but comprehensive explanation of its use on the Soliftec website, which included three different types of grid, a picture showing its use and record card.

It is suggested that air pollution of this nature is not so great in the West, but it is clearly still important to combat it for those emerging nations ' While Europe has managed to drastically cut some, but not all, of the most noxious pollutants ... emerging nations experienced the opposite trend....  The World Health Organisation estimates that about 2 million people die prematurely every year as a result of air pollution'  So globally a lot has still to be done.
http://www.sundayobserver.lk/2001/pix/PrintPage.asp?REF=/2009/04/05/jun04.asp

This is the background leading to the collection of relevant information to help towards a wall hanging.

Visual Reference
From all this information I produced a Visual reference containing a number of images, some documentation and abstract terms.  In order to distinguish between different periods of pollution I built up columns, with a tonal variation both vertically and horizontally.


The photographs selected reflect skies, clouds, smoke and chimneys, water and the colours.
The left column the darker, blacker side of air pollution adding the smog, murky element for the wall hanging.
The middle column the greys and the right brighter column
I also made a topic web


Drawings
Several drawings were made related to collected photographs (mostly my photos, references are given to those from secondary sources).  The drawings show shape, textures, patterns and colour related to smoke, clouds and water.  I used coloured pictures and drawings linked to a possible colour scheme for the wall hanging.  The marks will help when coming to do stitching.
These first three are linked to the left hand column.


These next five are related to the central column


This final set linked to the right column


Words related to the topic
In the topic web there were a number of words related to the topic, from these and a selection of abstract words is the following list
 
Selection of compositions or designs
Using black card 10cm x 10cm a series of compositions or designs were made related to the words, especially to show the abstract words.  The words were added to the design.
The compositions were then reworked using coloured papers 15cm x 20cm.
Using scalpel, metal ruler and cutting board it is important to be conscious of Health & Safety, ensuring the scalpel is covered when not in use.  Ideally the ruler should have a ridge along its length to protect fingers when cutting.
The colours used are shown here, based on those already identified.


Here are presented in pairs first the black design then the coloured design:


These last two are based on stitch work in Chapter 7 

 
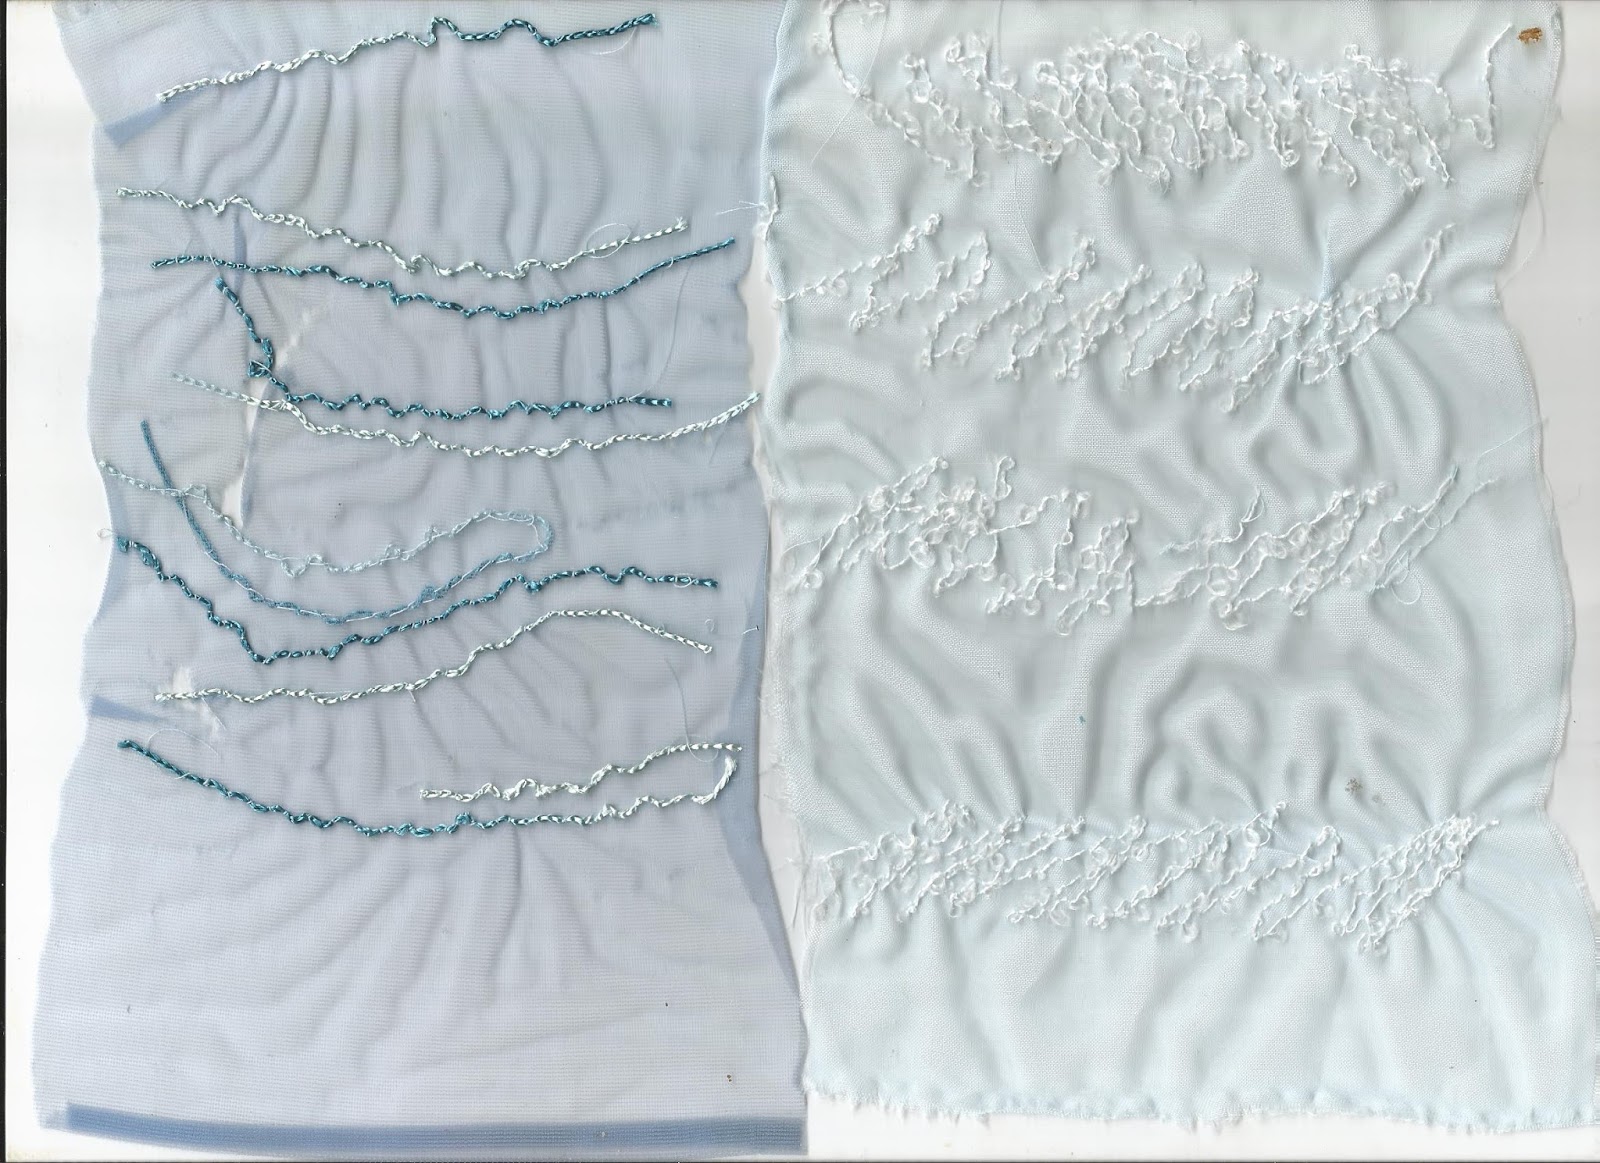
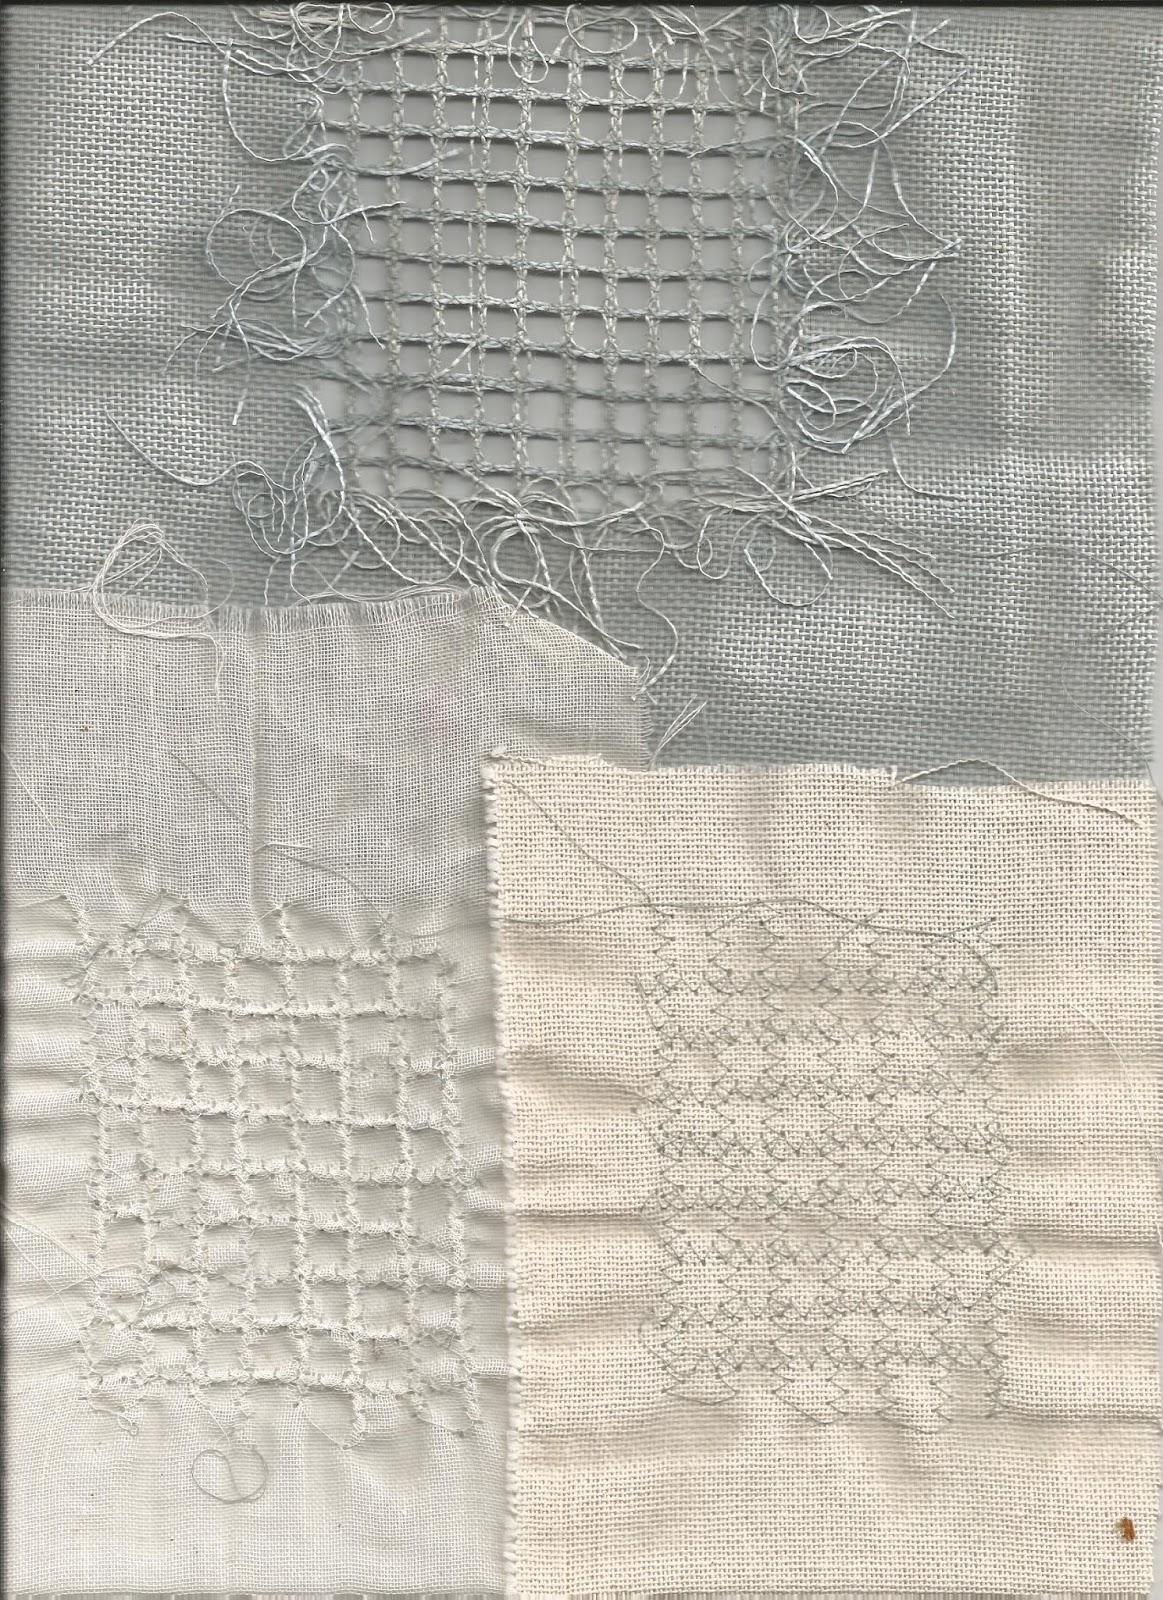
To date I have selected five designs i,j,k,o,and r from which I will need to select 3 to make A3 compositions in Chapter 9 and final one for my final wall hanging.  Meanwhile I've put together a collection of pictures, drawings, and a few pieces of stitch made in previous chapters and am thinking of having at least if not more free hanging columns of work, either completely loose or stitched loosely together using stitch on dissolved fabric.  I hope to incorporate some manipulated fabrics, possibly in cotton, the other fabrics being delicate such as scrim, silk, satin, organza, voile, chiffon, cotton scrim and muslin.
This picture is of my ideas without stitched pieces added
 
 
The following three have stitched pieces added (See how the grids show through the smoke at the top)
Also the dissolvable fabric piece ripples in the sea as a possible joining between columns 2 and 3 


An alternative to having several columns of work - I have thought about three overlapping hangings on one of those towel rails that moves like opening the pages of a book, revealing different stages of pollution or tones.  I know the back of the work would also appear but that may be intriguing.  Those parts worked in dissolvable fabric would almost be back to back.


Wednesday, 3 February 2016

Chapter 7 Use of dissolvable fabrics

In this chapter I produced samples made of only the threads of stitchery to produce a lace effect.  These include either a whole piece or part of another piece including earlier dyed fabrics or trapped 'bits' (threads or tiny shears).
There are different soluble fabrics or films on the market which once rinsed in cold or warm water leave only the threads or elements attached by the threads.

In my notebook I have listed sections from five books on using dissolvable materials.

The work in this chapter is divided into three sections

Technical samples
Soluble lace pieces
Soluble lace samples using different stitches based on sea and sky drawings

Technical samples
I collected together a few different soluble materials, producing a card catalogue showing a sample, with source, cost, whether it is a cold water or warm water dissolvable item and whether it is best used in a hoop or not, single layer or double layer.
Test
In order to test the different samples, all aspects of the test were kept the same except the material.
Selected a small design, 3cm x 3cm, same stitch, ensuring the threads crossed when stitched to hold the piece together, same threads top and bottom on machine, and used a hoop with all. The lines of stitching need to cross otherwise the stitching unravels when the fabric or film is dissolved.  The design was drawn on by tracing the pattern using a Sharpie pen, unlike some felt tips the design was clear and washed out when rinsed.
After stitching using a running stitch, straight lines double, curved lines single, the excess fabric was cut away.
Each piece was pinned on to polystyrene to keep its shape, dissolved under running water and left to dry naturally.

 
Observations are written below each sample
Preferences
Sample 1 Romeo film did not dissolve fully in cold water so used warm as well.  It was a lot stickier before it dried. I feel this would be very useful if wanting a firm lace or to manipulate and shape, possibly into a 3-D piece
Sample 2 An opaque film is not as stiff as Romeo, but could be used similarly
Sample 3a and 3b Plastic grid like film (name unknown, was in my stash of materials)  tore when single layer used so repeated the test using a double layer.  Softer lace but did not seem to hold shape as well as others.
Sample 5 Cold water dissolvable fabric was the best in my opinion, dissolved fully with cold water, not sticky and soft with good shape retention
Sample 6 Paper dissolvable material, also dissolved fully, not sticky, soft with good shape, and was easy to draw the design.  However stitching into paper sometimes the machine needle acted as a perforated line cutting the material.
 
Further work is either with Cold water dissolvable fabric or Romeo dissolvable film 
 
Soluble lace pieces
 
Several samples were produced 3cm x 3cm
The Cold water dissolvable fabric was first put in a hoop
The first seven used one layer of fabric
The remaining samples were using a double layer of fabric (to avoid unnecessary tearing and to trap bits when required)
Stitching was produced within the 3cm x 3cm using a selection of techniques.
Excess fabric was cut away, each piece pinned on to polystyrene and once the fabric was dissolved away using running cold water, they were left to dry naturally.
Observations of results are noted below each sample accompanied by which techniques were used, numbered here:
 
Techniques
  1. Normal stitching
  2. Free machine embroidery - feed teeth down
  3. Open effect
  4. Closed dense effect
  5. One direction
  6. Opposite directions
  7. Curved shapes/spirals
  8. Straight stitch
  9. zigzag stitch
  10. cable stitch - feed teeth up
  11. whip stitch
  12. metallic thread
  13. Trapped 'bits'
  14. 3-D shape
  15. Grid effect
  16. Wavy lines
  17. Haphazard directions
  18. Cross over


Particularly like samples with cable stitch, the double layers they produce and those with black and silver metallic grids.
The one with trapped bits seems rather crowded, and the whip stitch waves need to be interwoven more effectively as on the left half of the piece.  I did not add beads because they may have broken the needle when trying to stitch the fabric.  If beads are needed in a finished piece perhaps they could be added after and hand stitched.
I think using 3-D would be very effective if such was required.  It is useful not to dissolve away as much of the fabric to ensure that you can obtain a  manipulated structure.
Some of the fabric when wet stuck to the polystyrene, but could be eased off once dry.  They were not as sticky or stuck as much as some of the other films. 
 
Soluble lace samples using different stitches based on sea and sky drawings
Here are eight samples. 
For each, there is a copy of the drawing, a sample with dissolvable material still in place, then resulting dissolved sample.
Mention is given to which soluble material is used; whether it is with or without a hoop; stitches used in which thread, and any additional material forming part of the piece.  All but sample 8 are about 10cm x 10 cm.  Sample 7 is 15cm x 20cm.
Comments are added after each.
 
Samples 1 and 2:  Dissolvable materials with stitch only
 
Sample based on 3rd in both columns, using colours in the second column


Sample 1
Dissolvable Material: Romeo film, no hoop
Stitches: Cable stitches - Straight stitches in variegated wool, bobbly blue wool (worked better with teeth up); overlaid with straight stitches dark blue machine thread (feet down)
Upper thread white machine thread
Comments: Made sure stitches overlapped.  Not a delicate piece but captures the rich blue water effect.
Maybe would have been better if I had used a hoop.  However, the squint effect gives the feeling of water possibly overflowing to the right
 
Sample 2 shown above based on the following drawing at the top of the column


Dissolvable Material: Cold water dissolvable fabric, with hoop
Stitches: Cable stitches - Straight and spiral stitches in a selection of 2-ply wools with tonal variations white to black (worked better with teeth up); overlaid with straight stitches 2 per top needle yellow and orange machine thread (feet down)
Upper thread white machine thread
Comments: Made sure stitches overlapped.  Not a delicate piece but captures the darker heavier cloudy skies at sunset and tonal differences.
The shape is well delineated.
 
Samples 3 and 4 Dissolvable fabric used to stitch over cut away spaces or trap fabric that was cut away
Samples are based on the area outlined in pencil


Sample 3
Dissolvable Material: pieces of Romeo film over the spaces, no hoop
Stitches: Zigzag and straight stitches - using black machine threads on the top and white on lower spool
Comments: Varied the width of the zigzag stitches with consistent length.  The stitch emphasised the black markings on the drawing to over white spaces.  The coloured fabric reflected the colours in the drawing
 
Sample 4
Dissolvable Material: Romeo film double layer to trap 'bits' made up of a variety of threads, the pieces cut out from Sample 3 and additional fabrics of voile and organza to capture the colours from the design, no hoop
Stitches: Straight stitches in black and pale brown machine thread and white on lower spool
Comments: Not such a lacey piece but managed to make it look like brown water.  Stiffness left from not dissolving the film fully allows manipulation of the final piece to give a 3-D wave effect
 
Sample 5 Using dissolvable fabric across a space with trapped fabrics and lacey effect
 
Sample based on top drawing in first column


Sample 5
Dissolvable Material: Romeo film, across two vertical strips of dyed cotton, no hoop
Stitches: Straight stitches and zigzag stiches overlaid to give a denser mass of stitching in white machine thread on top and bottom.  Extra strips of roughly cut  voile, muslin and scrim
Comments: Made sure stitches overlapped.  This became quite a stiff piece, because of some non-dissolve Romeo.  I think if I'd used cold water dissolvable fabric the finished sample would be softer and hang more loosely.  Felt there was a better combination of fabric and lace in comparison to Sample 4
 
Samples 6 and 7  More lacey piece and sample with lacey edges
 
Sample made using blue and green coloured drawing

 
Sample 6
Dissolvable Material:  cold water dissolvable fabric,  no hoop
Stitches: Cable wavy running stitches in turquoise shiny thread and white and silver 2-ply wool (teeth up)  and  free machine black and white metallic machine thread (teeth down). 
Comments: Made sure stitches overlapped.  Even though there were wide spaces the lacey effect stayed together.  There was some sticking to polystyrene but peeling it off there were some bits of polystyrene left attached to the threads and provided an additional effect to the piece.  Could be used as an extra layer or on its own
 
Sample 7  Fringes added to a blue dyed textured fabric
Dissolvable Material:  Strips of cold water dissolvable fabric along top and bottom of fabric,  no hoop
Stitches: Top fringe Cable wavy running stitches in multi ply shiny man-made thread and white and silver 2-ply wool (teeth up) and for the circular stitch and free machine zigzag in pale blue and yellow thread (teeth down).
Bottom fringe Cable wavy running stitch in turquoise shiny thread and blue perle interspersed with free machine zigzag stitch in pale blue and darker sea coloured greeny blue machine thread with some wavy lines of metallic thread 
Comments: Made sure stitches overlapped giving different lacey effects.
 
 Sample 8 
Grid effect across cut out spaces (drawing was made later than previous pieces depicting the finished sample)


Dissolvable Material:  Romeo film,  no hoop
Initially joined three pieces of fabric: mucky grey muslin with tonal change in ink, pale grey dyed linen, and blue space dyed calico using zigzag stitch.  The spaces were cut out and stitched around with running stitch from left to right black and silver metallic thread, grey thread and white thread to match the threads forming the grids
Comments: Made sure stitches overlapped to form grids depicting those used to monitor smoke for the Clean Air Acts
Another time the spacing in the grids could be closer together hopefully to give a more solid structure.  Used the foot to equally space the lines.  Resulting grids have rather squiggly lines.  Also the grey of the middle grid could have been darker as it looked nearly white.
Washing the sample to dissolve the film did cause problems, as the ink was not fixed and ran
I also scanned the reverse of this piece before the film was dissolved. 
Maybe a similar idea could be used in a hanging where both sides show rotating around a central attachment.


I enjoyed using dissolvable fabric and hope to include this technique in the final wall hanging


Monday, 18 January 2016

Chapter 6 Cut work

In this chapter made applique technique samples which were based on designs in Chapter 2, combining:
  • different numbers of layers of machine stitched fabric
  • different techniques for cutting the fabric
  • using different stitches; free machining, cable stitch, whip stitch and programmed patterns
There are four samples all approximately 14cm x 20cm:

Sample 1 is using two layers based on the developed Design 1 from Chapter 2

 
Background fabric: The frottage pattern was stitched using a spiral pattern of the zigzag machine pattern on space dyed cotton calico
 

Second layer:  Two different layers were made both using a hoop:  the top sample shown below involved running stitch on chiffon following the subtle lines on the top layer of the design, the second outlining the edge of the cutouts on scrim.  Fine lines were drawn on the reverse of the fabrics to ensure stitching was limited to specific areas.


The final piece was made up of the chiffon layer stitched to the background fabric, using sufficient lines to hold the two fabrics together, then cut as the cut shapes dictated.
Both cut outs were cut with very sharp small scissors then frayed. 
However the scrim was cut as a separate layer with no attachment and could be added as a third layer.
 
Completed piece two layers and what it might look like with the third layer added.
 
 
The two-layered sample shows more clearly the light striations in the top layer as found in the design


Sample 2 is three layers using a frottage sample with a black background from Chapter 2. 
Although there was no cut out design development I thought to provide a sample with cut outs on different parts of the next two layers to reveal the dark background fabric.  I worked mostly with cable stitch using thicker threads to represent the thicker pastel crayon lines.
 
The background was worked using a dark blue polyester cotton, with multi-plyed wool, variegated grey wool and 6 strand embroidery thread.  Some threads proved quite difficult to use in the lower spool, smoother and 4-ply or less running more smoothly.  If I wanted even more texture on this layer I could use thicker threads but hand couched or machine stitched using a zigzag stitch.
 
 
Layers 2 and 3:  The middle layer I chose to use nylon and variegated nylon threads.  The top layer pale blue voile with a zig zag arrangement of running stitch using with a loopy cotton thread
 
 
The middle layer was attached using variegated sea coloured thread in free machine wavy running stitch ensuring space was left.  The fabric was cut in long sections, the nylon curling up slightly at the edges.
The top layer was attached using diagonal zig zag arranged rows within the area of existing stitch, on to the existing two layers.  These were cut to leave the four banks of stitched fabric and frayed.
The total effect represented the original design but the top layer could have been in a less opaque material, or maybe the middle and top layers could have been switched. 


 Sample 3: This is made up of three layers using Design 4B from Chapter 2
The difference in this sample is using organza and voile and cutting with a soldering iron.
 
 
The background fabric is mottled grey felt with lines of cable stitch mostly perle thread.  Not shown here but on the final piece I added a cable stitched diagonal shaded area across both the top and bottom areas overlying the rows using 6 stranded embroidery thread.  I chose to provide these colours to pick out the bleached areas on the design coloured paper.

 
The next layer is cable stitch variegated brown wool with upper thread in white, stitched leaving areas to be cut.  The fabric was cut where the drawn design occurred, melting the edges.  (Health & Safety required a well ventilated room, safe storage of the soldering iron and I would wear a mask to protect against the odour from the burning.  There was a glass cutting mat)


The final layer was a glittery organza with running stitch and some circular effects.  The thread in the lower spool was vanishing thread.  This picture shows the cutting once completed was turned as I felt this layer showed the design separate from the middle layer.
 
I then turned the whole piece to highlight the design pattern from the original

 
 Each layer was attached using pale brown wavy lines, first the middle layer then the upper layer.
 
Sample 4 was probably done using truer applique methods
 4 layers were added to a Dylon painted with tonal changes on calico background based on Design 6 in Chapter 2 - Sheets of equal size of grey felt, linen scrim and shiny white organza.
 
 
The different areas were drawn on the back of the calico piece

 
This side was used to guide the cable stitched areas - initially the stitch requirements on the grey felt

 
Using the lines and sharp small scissors I cut away the felt
I then cable stitched the dominant design on the linen scrim.  The choice of fabric highlighting the textured patterns of the design. The required shape was cut away using the same technique with the felt.
Finally Vermicelli free machine stitching trapped the shiny organza in place.  I worked from the back of the sample since the tensions allowed the vermicelli stitches to show up.  Finally the organza was trimmed away looking at the front of the sample with some fraying.
The previous layers were stitched into as each layer was added. 


This final piece I feel worked particularly well a good representation of the original design.
 
It wasn't until putting this chapter together that I realised some broader and more textured areas could have involved use of couching of threads with machine zigzag.  Also the cable stitches were quite tight and precise I was not able to produce freer with looser holding threads
 
It is interesting how combinations of layers work together, sometimes working to a specific image or making happy accidents.


Chapter 5 Developments

Here are some developments of pieces presented in Chapter 5 with additional techniques

Sample 3b:  Orange and yellow lines of thread to present other drawing on this example.  Used two coloured upper threads in the one needle on most, otherwise one thread.
 
 
Sample 4a was revisited and a new piece made using both whip stitch and cable stitched running stitch, the former for finer lines parallel to one another for the fine felt tip drawings, the other using purple 6-strand embroidery for crayon lines thread to give more effect and dimension

 
Samples 5a and 5b:  Single fine lines have been accentuated using whip stitch and cable stitch, adding parallel lines alongside the original using variegated wool, metallic threads and 6 strand embroidery thread, above and below.  The thicker lines where thicker felt tips or pastel crayons were used.  These were very much developments from the simple original line drawings


Sample 5d The wavy lines were enhanced with whip stitched variegated thread and cable stitch in a shiny nylon variegated turquoise thread.  In addition further texture was added by slitting and stressing between some of the waves.

 
Sample 7a In revealing the background fabric using finely cut slits gives more depth and texture to the piece, shadows to the wavy lines in addition to the machine programmed pattern


Sample 8a:  A new version of this was made, double the length of the other samples.  In order to produce cable stitch throughout the reverse image was drawn on the back of the grey Dylon dip dyed white velvet fabric.  Using a selection of different threads in-keeping with the original drawing, capturing the rhythm and colours of the design.

 
Sample 9a For this a chenille approach was given to the spiral stitching , cutting with scissors between the lines of stitch, sometimes only the top scrim layer, sometimes also the layer beneath.  The fabric was then stressed by rubbing the fabric together giving a frayed effect in places.

 
Samples using wing needle:  Here are two extra samples where a wing needle was used to obtain larger holes either side rows of stitch especially in the purple scrim piece.  Delicate yellow chiffon was manipulated accompanied also with small tucks.  And three further pieces where I used linen and cotton scrim.  The top one of these has withdraw threads using zig zag stitch and wing needle to cover the bars to form a more structured grid. The other two grids of which the back of one gives a raised effect.


Samples using Vermicelli stitch:  These two extra samples represent different ways of using this stitch.  The first involved a background infill using blue thread within a quilted piece.  The non-stitched areas are slightly raised.
The second piece is using an haphazard vermicelli using a variegated sea coloured thread on net overlaying some running stitch.  Although not obvious on these examples vermicelli can be used to shade and provide a tonal variation.

 
Finally a sample attempting to produce a series of satin stitch areas using a variegated thread.  The top area has lines of running stitch, the lower area the machine zigzag altering the width of the stitch to give a wave type effect.  The reverse of the fabric was interesting in that the white thread used in the lower spool showed tighter tension, consequently I turned the fabric over and did some short sections between some lines on the reverse to give a glimpse of white threads on the main side of the fabric.

 
It is interesting how using a mixture of threads and stitch techniques alongside one another can enhance an area of stitch and give it more character and texture.