Saturday 2 April 2016

Records of Work for Module 6 and Authenticity of Work

Costings and times of Design work and Embroidery Work for wall-hanging:

Started Design work 5/2/16 completed 29/2/16 Number of hours: 48 1/4 hours

Started Embroidery work 1/3/16 completed 20/3/16 Number of hours: 42 1/4 hours

Costing of  Design and embroidery work for wall hanging

Item                     Supplier                Cost of item           Amount used             Estimated Cost    
Design
Pinboards             Charity shop           1.00 each                   all                                2.00
Toner                    Amazon                  25.00                         all                              25.00
Black card             The Works             1.50                           half                              7.50
Glue                      Stermat                   1.00 for 3                  half of 1                       0.15
Notebook                    "                        1.00                           all                                1.00
Pencils/pastels/felt tips                         in stock                                                         N/A
Blue/Green gel pens                             2.15 each                  10%                             0.42
Black                    Stermat                    1.99                                                               1.99
Sharpie                 The Works               1.99                                                               1.99
Coloured papers                                    in stock                                                          N/A
Tissue paper                                                                            3 sheets                       0.75  £44.05                 

Sandra Meech book                              in stock                                                          N/A
Print blocks                                           in stock                                                         2.00
Print block tools (pkt)                           in stock                                                         8.95
Acrylic paints x6        Alpha Business  4.99                            10%                           3.00
Acrylics x"            The Works               3.00                            10%                           0.60
Tissue papers                                         1.99                            50%                           1.00
Bubble wrap                                          in stock                       free                            N/A
Black paper            The Works             1.00 pkt                       all                              1.00
White card                                                                                                                   1.00
A3 cartridge paper  Amazon                 8.00/100                      12                              0.50
Gesso acrylic                                         4.99/500ml                  0.5%                         0.25
Transparent
material                                                 in stock                                                          N/A
Glue Stick                Stermat                 1.00 for 3                     1                                0.33
Fabric conditioner to use with fabric in stock for printing        third                            0.70
Friends equipment with no cost                                                                                           £19.33

Embroidery
Item                        Supplier                Cost of item              Amount used          Estimated Cost
Cartridge paper       Amazon                 8.00/100                     10 sheets                    0.45
Acetate and tissue                                                                      A4x2                        0.40
Layer 1 fabrics and threads
Layer 2 fabrics and threads
Layer 3 Fabrics and threads                 see below

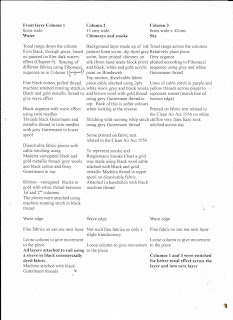
Because the wording and columns are disrupted when published on to the Blog I have decided to scan written sheets
Embroidery costs


Total Costings for design work £63.38
Total Costings for Embroidery work £42.50
 
 
Storage of Work. Materials, Tools and Equipment


Health and Safety rules observed

Here is a list of the items and working processes that have been used in Module 6, requiring special care and attention to protect myself, my environment and own work

All materials and equipment should be kept out of reach of children

Using bleach:
  1. Don't work in a confined space, keeping windows open in order to avoid breathing in fumes
  2. Use gloves to protect hands
  3. Store bleach with a secure lid
Cutting paper and card
  1. Keep sharp scissors out of reach of children
  2. Hold carefully using handles
  3. Keep blades covered using shield supplied when not in use
  4. Use metal rulers with ridges to protect fingers
  5. Use proper cutting mat to avoid damage to surfaces
  6. If  necessary tape down material to be cut so able to cut accurately 
Drawn thread work
  1. Keep sharp scissors out of reach of children
  2. Keep needles sewn into fabric when not in use, or in appropriate container or needle case
Use of sewing machine
  1. Keep machine in good order
  2. Ensure flex does not cause trip hazard
  3. Ensure seating provides good posture when using the machine
  4. Switch off when changing needles or lower spool
  5. For cable stitch use an extra adjusted spool case to avoid damage to needles and to work stitching
  6. Store threads in lidded container or tray when in use
Use of soldering iron when cutting away shear fabrics
  1. Ensure heated end of soldering iron is in a heat proof container (eg upturned flower pot)
  2. Take care in use, holding insulated handle only
  3. Ensure flex does not cause trip hazard or will not knock over items when in use
  4. Ensure hands are dry when switching on and off at plug
  5. Use in a well ventilated room and if necessary use a mask, dependent on fabric
  6. Use a glass sheet underneath the work to protect surfaces, edged with masking tape to avoid cuts from glass
Using inks and dyes
  1. Use plastic surface under work to protect surfaces from spillage
  2. Use in a well ventilated room and if necessary use a mask. especially if using powders to protect lungs against fine particles
  3. Keep mixed dyes, salt and soda solutions in carefully sealed containers with non-metal lids and label contents
  4. Use gloves to protect hands
  5. Keep liquids away from electrical points
Using irons
  1. Ensure flex does not cause trip hazard
  2. Keep  iron on heat resistant surface or resting upwards to avoid burns and fire
  3. Switch off when not in regular use
  4. Ensure use the correct heat setting dependent on fabric or embroidery technique in use
  5. Use parchment paper to avoid damaging the iron, on some occasions both underneath and top of work
Authenticity of work
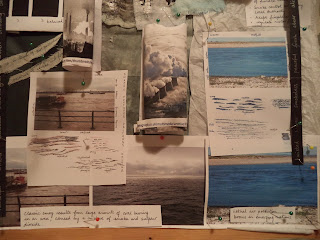
Below is a signed document by a fellow embroiderer to confirm that all the work carried out in Module 6 was completed by Linda Beagan




Evaluation for Module 6

The completed embroidered assessment piece for Module 6 is a 3-layered wall hanging based on the design topic of Conservation Clean Air Acts 1956 -1993 with hope for the future.

How do you feel about the resulting conclusion?
I am very pleased with the result.  I was very excited to research, design and develop this topic into a wall hanging, learning a lot through observation and translating from marks to stitch.  I feel the hanging reflects moods from smog to clean air showing rhythm, texture, colour and a range of dyed fabrics, soluble fabrics, machine stitch techniques and joining devices along each length.  The Fibonacci sequence worked and there was tonal change across layers and down lengths.  It is translucent enough with the reverse useable as well as the front.

Is it fit for purpose - give reasons?
I feel this would be an appropriate hanging for display in a business working towards conservation.  It is versatile in that it can be moved on its hinges or separated from the three rods and hung individually either on a wall or window.

If you were asked to make it again, what changes would you make to the way you designed it and the way you made it?
I might design and make the wall hanging totally differently.  Maintain the tonal variation in colour, use similar widths of fabric but produce one piece where they are woven together producing a 2-D surface overlaid with some tubes (3-D).  I love dissolvable fabric/film and could incorporate more of this especially for the 3-D structures.
As a more solid wall hanging I could incorporate more layering of both fabric and stitch, combining machine with hand stitching, adding beads, threads and dependent on the overall effect add a fringe or interesting lower edge.  I like rough edges/ seams.
The hanging of the piece would probably require a more substantial technique, but could still be tapestry based with or without a backing to the finished hanging.

Wednesday 23 March 2016

Chapter 12 Five artists

I researched five artists (of which the first three are more detailed) selecting work relevant to Module 6 by searching the internet and having seen or purchased books by Alison Holt, Sandra Meech and Frank Green.  (The pictures selected are subject to copyright and are used in this chapter as educational examples and not to reproduce in any other way)

Jae Maries
Barbara Lee Smith
Sandra Meech
Alison Holt & Frank Green

Jae Maries

Jae Maries is a member of the 62 group of textile artists having recently completed 4 years as chair (2009 – 2013). She started her career with a BA Hons degree in Fine Art at Reading University followed by a Diploma in Creative Embroidery (Distinction) at Brighton University.

I researched the artist on the website http://www.jaemaries.com/

Jae Maries is an oil painter and textile artist and tutor who has exhibited widely with many commissions of her work. She tries not to be influenced by other artists but admires Picasso, Matisse and Antoni Tapies.

Her inspiration comes from the world around her, using sketch books as a starting point. She also enjoys interpreting feelings, actions or visual stimuli in an abstract way and is currently basing her work on diary sketch book entries.

Her textile work involves using unbleached calico. Her fabrics are always painted or dyed, often applying Sericol screen printing inks after stitching and manipulating the fabric. The dyes are applied with a palette knife or sponge roller. These fabrics are then applied to the oil painted surfaces which have been stitched before the application of paint.

Jae uses a very restricted palette and selects colours that will underline the feelings and ideas that she wants to express in a piece of work. She mostly works in hand stitch using machine stitch to join pieces. Does not like using metallic threads!

In her book 'Contrasting Elements' she shows through simple instructions how dynamism can be brought to work using contrasts in colour, materials and imagery by translating paper to fabric and stitch using contrasts in painting, cutting, knotting, knitting, weaving, wrapping and stitching.

I particularly like 'Turbulent seas' (2014) shown on Jae Marie's website relevant to the theme of water but with an abstract arrangement and minimal stitch.

Barbara Lee Smith

Barbara Lee Smith is an American artist and worker in textiles and amongst her compliments for her work she was made an honorary member of the Embroiderers' Guild, UK. She started her career as a textile artist later in life following a fine arts course leading to an MFA in 1978 with honours. Throughout her life she has had a goal to help the field of textiles be recognized as a major art form and for artists to have recognition when working with fibre as their primary medium.

I researched the artist on the website http://www.barbaraleesmith.com/

Her influence is 'rhythms of nature' and the importance to sustain it for the future, in particular expressing in her large art pieces non-representational images of the land, sea and sky.

She works usually using an industrial grade polyester non-woven fabric which looks like paper. She paints using Daniel Smith acrylics and Golden Gesso and silk paint pigments for light-fastness.

She uses a three stage process of layering, painting, collage and line running machine stitch representing a contour effect.

I rather like this idea of making a topographical image on the work (the geographer in me!).
There is a very useful website which answers many questions about this artists work

I have chosen a piece from this second website showing water and the contour stitching.

Barbara Lee Smith – Marshland Spring (detail)

Barbara Lee Smith – Marshland Spring (detail)

Sandra Meech

Sandra Meech is author of several books but the one I found particularly useful related to this course is 'Contemporary Quilts: design, surface and stitch' published by Batsford (2003) 2005

It seemed to cover many aspects of the course from inspiration sources uses of paper, paint and pattern, collage, cloth, dyes, fabric paints and sticks, plastics, elements of design, colour theory, stitch techniques and assembly.

Information about this artist can be found at


and


She is originally from Canada, inspired by nature and a sense of place. She uses photo imagery, drawing and collage as starting points.

In the 1990s she acquired City and Guild qualifications in Stitched textiles, Patchwork and quilting. She has acquired many international awards and work is exhibited in public and private collections, and travels worldwide teaching classes in creativity, art and design with mixed media.

I would like to highlight her work on the Somerset Levels, (she no longer lives in Canada!) which can be found on the second website mentioned above of which this is one image. It includes monoprints and collographs as well as machine stitching in running stitch to create textured quilted effects.


Alison Holt & Frank Green

One is a textile artist the other a water colour artist. Both I have managed to see their work and hear them speaking. Alison Holt visited our Embroiderers' Guild a few years ago and Frank Green was a recent speaker at a local art event in Llandudno. Both are extremely talented in producing realistic images which I wished to mention although the brief for Module 6 was not to do so.
Information can be found about Alison Holt at
Alison Holt is author of 'Machine embroidered seascapes' Search Press Ltd , 2012 and appropriate topic.
In the book she gives clear instructions of how to use inspiration sources, sea and sky in this instance, using planning and composition, painting on fabric, selecting and using threads for tonal shades and machine stitch to produce beautifully layered work.
I love her work and was so happy to eventually get her book. Here is a copy of the book cover which also shows one of her seascapes.
Frank Green is a water colour artist and was instrumental in producing several paintings of Liverpool streets, capturing their characters even before some were demolished (another conservation or preservation theme). He was raised in Walton and educated at Florence Melly School and Liverpool Art College.
Information can be found about Frank Green including a fascinating video where he talks about his background to becoming an artist, at
I purchased a short book of the architects of Liverpool by Frank Green in which there are many of his paintings and sketches of Liverpool, but I particularly like some of his paintings showing water and sky. I managed to purchase some of his cards of art work which portray areas of the waterfront in Liverpool, through the seasons and showing the difference between night and day. (See also Chapter 1 of Module 6 where there are photos from his demonstration of a seascape, Penmaenmawr, North Wales).
Looking at these cards I noticed how well the marks used in the water were visible and would make interesting stitched fabrics.


Tuesday 22 March 2016

Chapter 11 Making the wall hanging

Converting a paper design to an embroidered wall hanging

There are different ways to convert a paper design to embroidered techniques to form the wall hanging

Here are brief outlines of 6 possibilities, where I eventually chose the sixth
  1. Using a log cabin idea: by seaming strips together using a traditional technique or showing off the frayed edges
  2. Each are a of the design is made separately then in which ever design plan chosen attach the fabric to a stronger backing fabric such as calico
  3. Translate the design into a woven structure interlacing strips widths cut according to the Fibonacci sequence following the paper design (with several permutations)
  4. Make the background fabric using stitch and different coloured fabrics considering complementary colours in the arrangement, overlaid with another appropriate made-fabric design
  5. Each paper shape made into individual pieces of embroidered fabric and stitched together with insertion stitches, either left loose or attached to a background of calico, Vilene or canvas to show off the insertion stitches as well as the pieces of made fabric
  6. Use a vertical paper design based on Fibonacci both width wise and length wise, where each vertical piece hangs loosely as one complete piece or as several layers.  Overlapping layers requires some translucency therefore shear fabrics were chosen and stitched or made with dissolvable film or fabric. 

Here is a picture of the completed closed wall hanging (photographed at a window) showing the three layers
 
 
Finishing edges
There are a number of edges and five are mentioned here, of which I selected the sixth:
  1. Simple turned hem, flat or padded to form a frame of different widths
  2. Simple turned hem leaving a decorative front not requiring a frame
  3. A lining fabric added and stitched up to the edge
  4. Lining fabric stitched directly on to the back of the fabric
  5. Attach a fringe to the bottom of each length
  6. Edges left rough and untrimmed or not hemmed where the fabric almost has the final say
I selected the final method cutting the edge of each layer into a wave, (slightly different on each layer). I wanted the hanging to move in the breeze if at an open window or from other draughts from a door or people passing
 
Methods of hanging
There are several techniques
  1. Hidden methods using rings, tabs, sewn on to lining fabric or back of embroidered surface a few centimeters from the top edge
  2. Sew a channel between the lining and the front surface through which a rod or other could be threaded
  3. Visible methods sewn between the lining and embroidered surface, where the rod or other might be painted or dyed or wrapped with fabric
  4. Sleeve to enclose a rod with a hemmed seam into which can be slotted the hanging
  5. To hang these vertical strips it would be useful to adopt some tapestry techniques.  There is one web site that describes a few different techniques in a simple way:  http://www.wikihow.com/Hang-a-Wall-Tapestry
I chose one of the tapestry techniques where I made a sleeve for each rod and then attached each piece of each layer for stability within a hemmed seam.  There are three rods in all and because the fitment is hinged the layers can be left all hanging over one another or opening each layer like a book where the back of one piece is alongside and to the left of the other hangings  (Illustration in Chapter 10 is shown again here)
The sequence of sleeves on the rod in cotton are for tonal effect: mottled black(front layer), mottled grey(reverse of the first)(middle layer) and white (back layer).


Presentation of Supporting work as two A2 boards plus full and half size coloured paper patterns alongside
 
Research and design (1)
 
This A2 board shows photos, appropriate text related to three Clean Air Acts, water, smoke and sky photos and drawings, words and thoughts associated with the theme, black paper design (Fibonacci) where final decision was with four vertical lengths repeated over three layers and the Ringelmann Smoke charts used to measure levels of polluted or not smoke from chimneys
 
On the left is the full size paper designs, upper right part of one darker top layer which was based on an altered design bottom right
 
Research and design (2)


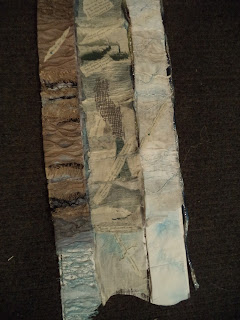
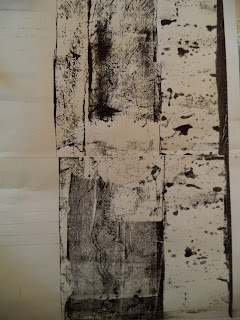
This shows different fabrics used including ribbons and some text on fabric, dissolvable fabric samples, twin needle, cable stitched and gathered stitch with copies of the three print blocks that were made of the chimneys (Intaglio). Each vertical length depicts the materials used in each layer from left to right, top to bottom.  I also wrapped pipe cleaners with the threads used on each layer (inserted on the originals not here)
 
Finally here are a series of pictures showing the final hanging, layer by layer and one extra for each layer showing details of work
 
Front of top layer

Reverse of front layer

Detail on front layer
 
Front of Middle layer

Reverse of Middle layer

Detail from Middle layer
Front of Back layer

Reverse of back layer
 
Detail from back layer (not at window)
 
Front layer opened to show reverse with other layers on the right


Friday 18 March 2016

Chapter 10 continued Further wall hanging developments in stitch

I have completed each hanging for the three sections, except attaching them to the rods.
I see the wall hanging in layers:
Top layer depicting smog and high air pollution (Clean Air Act 1956)
Middle layer some improvements in air pollution (Clean Air Act 1968)
Back layer clear and less polluted skies and water (Clean Air Act 1993)

Working on each hanging, here are some of the techniques used:

Top layer (blurred- sorry)


Middle layer
 
 
Back layer


There have been changes from the original design.  Initially had the tonal range from left to right, but as the work progressed because in general the water hangings were darker I decided to alter the arrangements.  So, for each hanging placed the water hanging first, then middle one remained in place, with the sky hanging last.  The ribbon moves from left to right across the hangings.

There has been a small group of friends that have met and I have welcomed their comments and ideas.  The last meeting was on Tuesday 15th March 2016.

One regular person is missing making seven of us (there was a visitor this day)

  • They suggested switching the arrangement and I agree the tonal range across each hanging flows better into the next
  • When attaching the layers to the rods I propose a covered fabric open at each end - dark, medium grey and white and they felt it would be best to attach the first layer using dark fabric to the top rod, revealing the tonal range as the rods open
  • The sleeves on the rods to be open ended revealing the metal ends and the pieces attached directly on to the fabric sleeve
  • I was considering adding some net to the middle hangings but in general we felt this was not required
  • Decided to retain the rough edges around each hanging
  • Shaped edge at the bottom of each layer enhanced the design, and they felt a fringe or further additions to hang down may not be required although possibly a covered washer or beads to weigh down the ribbon may be good
  • The representation of Ringelmann Smoke charts I feel is important as they gauge the quality of pollution from the chimneys.  I could either make some using dissolvable fabric and cable stitching appropriate coloured threads or, I felt it would be more successful to provide grids shaped haphazardly like the smoke located above each chimney
Here are some pictures showing the layout of the hanging layers (at the group meeting, before completed)


The next three show more detail of the stitching on the uncompleted pieces


Working on the hangings including the grids.  Using a selection of threads for cable stitching on to dissolvable fabric


Here are a series of photos of the completed hangings

Layers on top of one another alongside original design drawings


Top layer with others underneath


Top layer opened up, revealing back of it and the remaining two layers on top of one another


Middle layer on top of the top layer (back view) revealing back layer

 
Back view of all layers on top of one another


The nature of the fabrics used and stitching does allow to see through at least two layers at a time.
The back of each layer is less complex in stitch but does not detract from the main stitching on the front of each.  Also it blends with the next layer in the sequence when it is alongside it.

Finally as a lead on to Chapter 11 here is some initial work on the attachments for each rod.
The location of the hanging could be in front of two windows with a wooden section between wide enough to attach the main fixture for the rods.
The nature of the sleeves also allows some versatility, such as allowing the hanging to be removed from the rods and hung separately in a type of triptych or as preferred.


I am now working on hanging each layer

Overall I think the piece does have a smokey effect as required with a clearer presentation on the back piece
I am reluctant to add further stitches, fringes or beads, but maybe this could be considered.
In Chapter 11 will be clearer photographs of each layer and their translucent effects against a window.


Saturday 5 March 2016

Chapter 10 Converting design into embroidery

Initially I looked at the last three designs shown at the end of Chapter 9 to select one that could be converted into an embroidery of three layers. 
I tried to select one of the designs that might be repeated in some way from one layer to the next, with links between the layers.


I chose the middle design as the main framework.
I reduced it to four columns to coordinate the layers and made a design sheet that was A3 in size and used coloured papers (31cm X 42 cm) the widths of the columns were based on the Fibonacci sequence 8, 13, 8, 2 cms
It was if column 1 represented the sky, column 2 sky but with smoke from the chimneys, column 3 water, column 4 a fine strip (the latter ribbon like which could be placed between different columns from one layer to the next.
 
 
In colour the columns were selected from the three layers.
I considered various options.  Initially I looked at rearranging the four chosen columns from layer to layer, but eventually chose to keep the same sequence
In black & white I copied three layers:
Top layer: 2 A4 sheets top and bottom of the design (A3 size)
Middle layer: 2 A4 top sheets with a bottom A4 sandwiched between (A3 size plus another A4 length)
Bottom layer: 2 A3 sheets, alternating top and bottom A4 copies
 
Top layer
 
 
All three layers with wave effect at the end of each


I used this and the repeated copies to select fabric, threads, samples from this module and manipulated fabric in Module 5
 
Top layer:
Tonal variations from charcoal black to lighter grey with hints of purple and yellow (the latter just lines of stitch)
 
 
Column 1:
Grey organza pleated using gold and black metallic thread divided up in Fibonacci divisions 3, 8, 5, 5, 8, 5, 8, 1.  Plain column other than pleated areas with tonal variation  (An alternate idea might be to have haphazard pleating in the same sections or/and some cabled single rows in purple, yellow and white threads to overlap the each lower section of pleats.  Another idea might be to have tonal variation darker, even black at the top each section containing flat and pleated area with torn frayed lower edges
Column 2:
Linen scrim overlaid with from top to bottom dissolvable fabric piece (See sample) same colours, strips of painted linen scrim (as shown) alongside painted bondaweb, plus chimney and smoke printed on silk and overlaid with torn strips of black net (tuille) to blend edges. (Transparent layer but less than the other columns
Column 3:
Considering tonal variation sections, fine black cotton with twin needle waves left complete or cut away in places, another section gathered machine stitching and a section of cable stitched waves on dissolvable fabric.  Threads would be black and gold metallic thread, black Gutermann threads and a mixture of different thickness for the wave effect.  There could be more than three sections with frayed edges between.  Additional stitch could be long zigzag stitch over the waves especially in the top sample.  Each section of stitch could match the Fibonacci sequence in the 1st column
Column 4: 
Variegated ribbon 2-3 cms wide (Just shows in the above picture)
 
Some text related to Smog and the Clean Air Act 1956
Each column could be joined to the next or left loose
This layer could have a wave effect lower edge with frayed fabrics hanging
 
Middle layer
Although longer than the top layer by another half A3 the columns could match it in width and each section going down within Columns 1 and 3 increased by 1 and half times.
The tonal variations would be from mid grey to white with some hints of brown, green (in the water- column 3) and blue (sky - column 1)
 
 
Currrently
Column 1 grey organza or chiffon overlaid with grey and white painted Bondaweb (unless used in column 2), stitched to match Top layer. The Fibonacci would match the Top layer but each section 1 and half original.  Pleats would fall in different spaces, stitched using grey threads with individual rows in cable stitch: variegated greys, white and hint of pale blue.  Feel tonal change darker to lighter from top to bottom would work.
Column 2  A mix of fabrics on dip dyed grey fine linen scrim with dip dyed scrim (shown above) and accompanied with a similar sized but different chimney with smoke printed on silk.
Column 3 Similar mix of wave with dimension lengths 1 and a half times top layer.  In the next photo is a sample being machine stitched in 2 layers, voile overlaid with organza using twin needle technique (threads metallic black and greens, metallic black and copper in lower bobbin, plus light brown Gutermann thread.  This could have the top layer reverse appliqued away, both layers cut away the rest left in tact.
 
 
Other sections might include wave effect different stitches and threads on dissolvable fabric using blacks, brown (as shown) and a layered section without the felt background (as shown)
Column 4 a similar ribbon as on the top layer, but possibly located between columns 2 and 3
 
Text related to the Clean Air Act of 1983 would run across the columns
Lower edge wave effect frayed or frayed finer strips of fabric used.
 
Bottom or back layer
Likewise the columns would have the same widths as the other layers but each section double the length of the top layer and same types of fabric and content for each column
The tonal variation would be medium to lighter blue including white and silver


So, Column 1 would have a plainer pleated finish with some overlaid stitching  Fibonacci as Top layer each area x2.
Column 2 on linen scrim mixture of fabrics and illustration of the taller chimney with smoke - images of the cleaner fresher divided up as shown on the top layer. 
Column 3 variegated tonal blues and a stillness to the wave effects(see 3 samples above of twin needle work, cut work and dissolvable fabric and a lacey effect at the bottom edge (not shown) possibly using nylon and spiral stitching or again incorporating the vermicelli sttiching
Column 4 the ribbon as before but this time tones of blue and silver (darker one for use on top and middle layer is shown here)
 
It has occurred to me that this layer could be thicker (as the back layer of the hanging) and incorporate some quilting.  Cotton fabric with its fresher appearance and manipulation could be used with cotton wadding overlaid with vermicelli stitching in column 1 and 2 for cloud effects in white and blue threads to leave raised areas in white.  In column 3 there could be piping with pipe cleaners manipulated into waves within fine linen scrim and pulled apart, or pulled thread or gathered sections.   However, the previous layers should hang and move so the last layer may be should not be too rigid.
 
Text related to Clean Air Act 1998 would flow through this layer
 
I 'll be following the designs in the paper copies where possible.  I noticed that in some of the top and middle layers I used the darker wave design, rather than the finer wave design in my original.  I think this is to give a rougher texture needed in the top two layers whereas the final layer is gentler and less chaotic.
 
I feel I need to get each layer completed before deciding on the final effect which is to cut out a section on Column 2 of each layer representing an area of black, grey or white smoke above each chimney then machine stitch grids, black and silver metallic thread on the top layer, mid- grey thread on the second layer and white thread on the bottom layer using dissolvable fabric (as the sample in Chapter 7.  The threads would be thicker than used before so cable stitch would hopefully work to give a rigid grid to represent the Ringelmann charts.